Version Control System (VCS)
- Code is always being updated and changed.
- A Version Control System (VCS) helps developers track all these changes in their code.
- While multiple version control systems exist, such as Subversion (SVN) and Git, we will focus exclusively on Git.
- Furthermore, we will integrate GitHub, the premier web-based platform for hosting and collaborating on Git repositories.
Git
- Git is a version control system designed for collaborative software development where multiple contributors can work on the same project at the same time without overwriting each other’s work.
- We can work on new features or fixes in separate branches without affecting the main project, then merge them when ready.
- Also, it helps in tracking changes in the source code.
- Think of it like a detailed history book for a project like it records every addition, deletion, or modification, so we can always go back to a previous version if something goes wrong.
- It’s free and open-source.
- It’s fast, scalable, and can work for both small and large projects.
GitHub
- GitHub is a cloud-based platform where you can store and manage Git repositories.
- It’s like Google Drive for code, where we can upload our projects, share them with others, and collaborate using features like pull requests and forking.
Getting Started
01. Create a GitHub Account:
- Go to GitHub and sign up using preferably a personal email or institutional email (Which might expire, although some benefit as a student).
02. Install Git:
- Download Git from git-scm.com. We can verify the installation by typing
git --versionin our terminal.
03. Configure Git:
- We should tell Git who we are:
git config --global user.name "Name"
git config --global user.email "abc123@gmail.com"
Basic Workflow
1. Creating a Repository (Repo)
- A repository (repo) is like a project folder that stores our files, code, and the complete history of changes. It can be created in different ways:
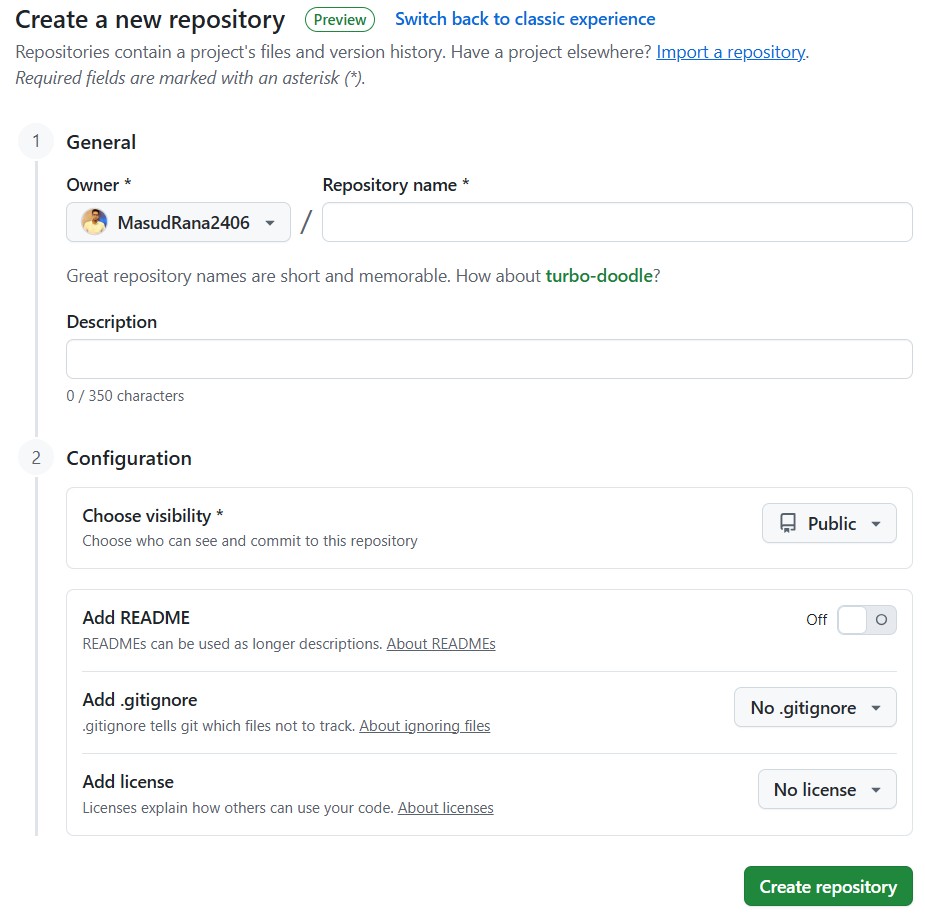
Option 1: On GitHub (Remote Repo)
- Log in to our GitHub account.
- Click the “+ New repository” button (top-right corner).
- Enter a repository name (e.g., my-first-project).
- (Optional) Add a description.
- (Optional) Tick “Initialize with a README” (recommended for beginners).
- (Optional) Tick Add.gitignore
- (Optional) Tick Add license
- Click “Create repository”.
>>This creates a remote repo stored on GitHub. It is best for creating repos online.
Option 2: Using a GUI Tool (e.g., GitHub Desktop)
- Open GitHub Desktop.
- Go to File > New Repository.
- Fill in details like:
- Repository name
- Local path (where to save on your computer)
- Option to add README, .gitignore, or license
- Click Create Repository.
>>This creates a local repo and links it to GitHub. It is easier for beginners who prefer clicking over typing.
Option 3: Using Command Line (Local Repo)
- Run the following command in the terminal inside your project folder:
git init
>>This initializes a new local repository in that folder (without GitHub). It provides more control and flexibility, used by professionals.
- To connect it with GitHub later:
git remote add origin <repository-link>
git push -u origin main
2. Cloning a Repository
- Cloning means downloading a full copy of a project from a remote server (like GitHub) onto your local computer. This gives us our own version to work on.
- It’s not just downloading files. We are creating a perfect, connected copy (“clone”) of the entire repository, including all its history and branches, ready for us to contribute to.
- How to clone:
- On GitHub: Find the green “Code” button on the project’s page, click it, and copy the HTTPS or SSH URL provided.
- Using a Git GUI (Graphical Tool): Look for a “Clone Repository” option, then paste the URL you copied.
- Using the Command Line: Open your terminal, type
git clone [URL], and press Enter (replace[URL]with HTTPS or SSH URL you copied).
- On GitHub: Find the green “Code” button on the project’s page, click it, and copy the HTTPS or SSH URL provided.
3. Committing Changes
- A commit is a snapshot of our changes, saved to our project’s history.
- Each commit requires a message describing what was changed and why.
- Using the Command Line:
Check Status: See which files have been changed.
git status
- Stage Changes: Tell Git which files to include in the next commit.
git add <filename>    # Stage one file
git add .             # Stage all new and modified files
# Other staging commands:
git rm <filename>     # Stage a file for deletion
git mv <old> <new>    # Stage a file move/rename
- Create the Commit: Save the staged changes with a descriptive message.
git commit -m "Add a clear summary of the changes made"
- Staging all modified files and placing a commit: we can stage and commit all modified files in one step (does not include new, untracked files).
git commit -a -m "Your commit message"
- Using a GUI:
- After editing our files, the GUI will show them in a “Changes” or “Staged” area.
- Write your commit message in the provided box and click the Commit button.
4. Pushing Changes
- Pushing is how we upload our locally committed changes to a remote repository (like GitHub), making them available to others.
- Using the Command Line:
- Check Remotes (Optional): Verify the location we’re pushing to.
git remote -v
- Push to GitHub: Upload our commits.
git push origin main # Replace 'main' with your branch name
For the first Time, when pushing a new branch for the first time, use:
git push -u origin main # The `-u` links your local branch to the remote one
- Afterwards, we can simply use:
git push
- Using a GUI:
- Look for a Push or Upload button after we have made your commits. The button often has an arrow pointing up.
- On GitHub.com:
- We cannot directly push to a repository from the GitHub website.
- We must use the command line or a GUI client to push from our local machine.
Pulling Changes from the Remote
- Pulling is a combination of two actions: it fetches the latest changes from the remote server repository (like GitHub) and immediately merges them into our local working copy.
- It ensures your local copy is up-to-date with the shared project history, preventing integration conflicts.
- Using the Command Line:
# Pull from a specific branch (e.g., 'main')
git pull origin main

# Or, if your local branch is already linked to a remote one:
git pull
- Using a GUI:
Click the “Pull” button (often represented by a downward arrow) to fetch and merge the latest changes automatically.
Before we push, it is critical to pull again. Someone else may have pushed their changes to the remote repository after our last pull. This step integrates their work with ours, ensuring we resolve any conflicts before uploading your code.
Sometimes, Git can’t automatically merge changes (e.g., when two people edit the same line). You’ll need to manually resolve these conflicts by choosing which changes to keep.
Undoing Changes in Git
- A key power of Git is its ability to let you carefully undo mistakes.
- The right command depends on where the change is in your workflow.
- Unstage Changes (Before Committing)
- Scenario: We’ve used
git addto stage a file, but we realize we don’t want to include it in the next commit yet. This command moves the file back to our working directory, keeping all your modifications intact.
- Scenario: We’ve used
# Syntax: git reset <file-name>
git reset index.html  # Unstages only index.html
git reset .           # Unstages all currently staged changes
- Undo the Last Commit (But Keep Your Changes)
- Scenario: We made a commit, but the message is wrong, or we forgot to include a file. This command “undoes” the commit while leaving all your changes as unstaged modifications so we can fix them and commit again.
# Undoes the last commit, puts changes back into your working directory
git reset --soft HEAD~1

# More common: Undoes the commit AND unstages the changes (keeps the code)
git reset HEAD~1
# or its modern equivalent:
git restore --staged .  # Unstage everything
HEAD~1means “one commit before the latest.”
- Completely Discard Changes (Revert to Last Commit)
- Scenario: We’ve made changes to some files (staged or not) and we want to completely throw them away, reverting the files back to how they were in the last commit.
# Discard all unstaged changes in your working directory
git restore .

# Discard changes to a specific file
git restore <file-name>
- Completely Discard commits and changes (Hard Reset)
- This command is powerful and destructive. It will permanently throw away any uncommitted changes and delete the specified commit(s) from our local history as if they never happened.
# Reverts your repository back to the state of a specific commit, discarding everything after it.
git reset --hard <commit-hash>

# Discard ALL local changes and commits, matching the remote exactly
git reset --hard origin/main
Warning: Only use --hard If you are sure you don’t need the changes and commits you are discarding.
Working with Branches
- Branches are a fundamental feature of Git that enable parallel development.
- They allow us to diverge from the main line of development (e.g., the
mainormasterbranch) to work on new features, experiment, or fix bugs without affecting the stable codebase. - Think of them as separate, isolated workspaces within the same repository.
Branching Commands:
1. Create a New Branch
- This command creates a new branch and immediately switches your working directory to it.
# Syntax: git checkout -b <new-branch-name>
git checkout -b user-authentication
- We are now working in an isolated environment called
user-authentication. Any commits we make will be recorded on this branch, leaving themainbranch untouched.
2. Switch Between Existing Branches
- To move our working directory to a different branch, effectively switching contexts.
# Syntax: git checkout <existing-branch-name>
git checkout main
Note: In modern Git, the switch command is often preferred for clarity:
git switch main          # To switch to an existing branch
git switch -c new-branch # To create and switch to a new branch (-c for create)
3. Merge a Branch
Once the work on a feature branch is complete and tested, you integrate its history into another branch (usually main) through a merge.
# First, switch to the branch you want to merge INTO (e.g., 'main')
git checkout main

# Then, merge the feature branch INTO the current branch
# Syntax: git merge <branch-name-to-merge-in>
git merge user-authentication
- Git performs a “three-way merge,” combining the histories of both branches and creating a new “merge commit” on the
mainbranch. This preserves the entire history of the feature development.
Understanding Remote, Origin, and Upstream
These terms describe the relationships between your local repository and other repositories it communicates with.
1. Remote
A remote is simply a shared version of your Git repository that is hosted on the internet or a network (e.g., on GitHub, GitLab, or a company server). It acts as a central hub where all team members can push their changes to share them and pull changes made by others to stay up-to-date.
- Think of it as: The central cloud storage for the project (like the shared Google Doc link).
- A single project can have multiple remotes, allowing you to collaborate with different groups.
2. Origin
Origin is the default, friendly nickname Git automatically creates for the remote repository you originally cloned from. It’s a shortcut that points to the URL of that repository.
- Think of it as: The saved “Home” address in your GPS. When you run
git push origin main, you’re saying “push my changes to the ‘main’ branch at the ‘Home’ address I cloned from.” - It’s a convention, not a special command. You can rename it or have other remotes (e.g., one named
clientorbackup).
3. Upstream
Upstream is a naming convention used to refer to the original, source repository that your own repository is based on. This is most critical in two scenarios:
- When you fork a repository: You have your fork (your
origin), and the original project you forked from is yourupstream. - When working on a team: The team’s main official repository is often set as the
upstreamremote for your local copy.
You add an upstream remote to easily sync your local work with the latest changes from the main project.
- Think of it as: The “Headquarters” address. You have your own branch office (
origin), but you need to periodically get updates from HQ (upstream) to ensure you’re not working in isolation.
Managing Project Dependencies with requirements.txt
- The
requirements.txtfile is a fundamental configuration file in Python development. - It serves as a manifest that explicitly lists all the external packages (third-party libraries) your project depends on to run correctly.
Purpose and Importance
- Dependency Specification: It records the exact names and versions of all required packages.
- Reproducible Environments: This file is essential for version control because it allows any developer (or a deployment server) to recreate an identical Python environment. By ensuring everyone uses the same library versions, it eliminates the common problem of “it works on my machine” caused by version conflicts.
- Collaboration and Deployment: It streamlines onboarding for new developers and is critical for reliably deploying applications to production, staging, or testing environments.
How to Use It
1. Generating the File (pip freeze)
- After we have installed all the necessary packages for our project in our virtual environment, we can generate the
requirements.txtfile. - The
pip freezecommand lists all currently installed packages and their versions.
# Navigate to your project's root directory
# Activate your virtual environment (highly recommended)
# Then, run:
pip freeze > requirements.txt
- This command creates (or overwrites) the
requirements.txtfile, writing the list of dependencies into it.
2. Installing from the File (pip install -r)
To install all the project’s dependencies on a new system or in a fresh environment, use the -r flag.
# First, create and activate a new virtual environment
# Then, run from the project's root directory:
pip install -r requirements.txt
- This command reads the file and instructs
pipto install every package listed at the exact version specified, ensuring environment consistency.
Continuous Integration & Continuous Deployment (CI/CD)
Continuous Integration (CI) and Continuous Deployment (CD) are a set of modern software development practices designed to automate and improve the process of integrating code changes and delivering applications.
Continuous Integration (CI):
The practice of automatically building and testing every change made to the codebase.
Developers frequently merge their code into a shared repository, where automated tools immediately verify each integration by running tests. This helps catch bugs early and improves software quality.
Continuous Deployment/Delivery (CD):
- The automated process of deploying successfully tested code changes to a staging or production environment.
- This ensures that software can be released quickly, reliably, and with minimal manual effort.
How it Works:
- Platforms like GitHub Actions, GitLab CI/CD, and Jenkins can be configured to automatically execute scripts (e.g., to run test suites, build applications, or deploy to a server) whenever specific events occur in your repository, such as a push to the
mainbranch or the creation of a pull request.
The .gitignore File
- The
.gitignorefile is a crucial configuration text file in any Git repository. - Its purpose is to tell Git which files, directories, or file patterns it should completely ignore and not track.
- While creating a repository, we can click
.gitignorein the root of your repository and list the names or patterns of items to ignore. Git will subsequently disregard them.
Forking
- Forking lets us create a copy of someone else’s repository on our GitHub account.
- We can experiment freely and even propose changes to the original project via pull requests.
GitHub Learning Roadmap (Beginner → Professional)
Level 1: Foundations (2–3 Weeks)
Goal: Understand Git basics and manage personal repositories confidently.
- Learn core commands:
git init,clone,add,commit,push,pull - Create and upload small Python or ML projects
- Write a clear
README.md(project overview + how to run) - Use
.gitignoreto exclude datasets and model files - Practice branching and merging
- Create a GitHub Profile README
Level 2: Structured Projects (1–2 Months)
Goal: Organise repositories professionally and simulate teamwork.
- Use structured folders:
/src,/data,/notebooks,/models,/docs - Add
requirements.txtorenvironment.yml - Use Issues and Pull Requests for workflow practice
- Plan tasks with GitHub Projects (Kanban board)
- Build a GitHub Pages portfolio site
Level 3: Industry-Ready (2–3 Months)
Goal: Demonstrate real-world collaboration and deployment skills.
- Learn GitHub Actions for automation (tests, deployments)
- Deploy a project (ML API, Streamlit app, etc.)
- Use Releases for versioned models
- Follow professional branching strategies
- Write clear, meaningful commit messages
- Contribute to an open-source project
Level 4: Professional Growth (Ongoing)
Goal: Build a strong, recruiter-ready GitHub presence.
- Keep repositories updated and well-maintained
- Pin 5–6 high-quality projects
- Use Discussions or Wiki for knowledge sharing
- Link GitHub to LinkedIn and CV